Introduction
Hi, Welcome to my personal wiki. This is meant to be a sink for all the things that I want to keep notes of. This was heavily inspired by the motto of Document Everything by @yoshuawuyts, from his knowledge repository. And thus, might be apparent from the similar title
This book is rendered using mdbook, which is a utility to create books from markdown files, and is heavily used in the rust ecosystem.
Programming Languages
Well, what did you expect? I am a Computer Science and Engineering student. Having said that, here are a few cool resources I found:
- Learn Anything: Programming languages
- Githut A small place to discover languages in GitHub
Rust
Rust has a unique ownership model that allows it to guranee memory safety and
run without a garbage collector.
From all the programming languages I've come across, rust defenitely has its
unique feel to it and requires a different way of thinking.
It has also made me explore design patterns other than
OOP (which is taught
extensively in schools and colleges)
Highly recommend it if you are interested in high performance or low level languages. Also check it out if you are into high level programming because rust can be quite friendly once you get used to it.
Links
- Rust API Guidelines A nice set of tips on how to design your APIs in rust
- A reddit discussion on what Cell and RefCell does
Cool stuff to know about
- Rust journey to async/await: A cool talk by Steve Klabnik, where he nicely presented the problems faced and their solutions to designing rust's async/await.
Short notes
as_ref
as_ref() has the signature &Option<T> -> Option<&T>
it turns a reference to an Option into an Option that holds a reference
if we siply try to do opt.unwrap(); with a reference to an option,
it will complain that it cannot mov out of borrowed content.
We only have a reference to the Option. unwrapping tries to move the value
inside to option out of it. which is not possible with shared references.
Error handling in libraries and binaries
When writing a library, Its common to implement the From<MyCustomErr> trait
for the standard library Error type. This allows us to use std::Result along
with a custom error type that implements std::error::Error. This enables the
users of our library to use our error type, the same way they use the standard
Error type.
But writing all the implementations can get boring and often quite repetitive.
thiserror is a crate that provides
a convinient macro to derive the std::error::Error trait for our custom error
type.
When writin a binary, using anyhow gives us
some nice convinience traits that is implemented for return types like the
context() method: which allows us to add custom error messages when our
application returns an error. It also provides an Error type that, when used
in the main function, automatically formats the errors nicely to stdout
Packages
A list of useful rust packages
- https://github.com/nikomatsakis/rayon - Parallelism library for iterable tasks
- https://github.com/Amanieu/hashbrown - Faster HashMap and HashSet, drop-in replacement
- https://github.com/dtolnay/thiserror - Convinient macro to derive Error for custom error types
Macros
Macros are basically code that generates other code. There are mainly 2 kinds of macros in rust:
- Declarative macros
- Procedural macros/Proc Macros
Jonhoo did a nice beginner friendly video on declarative macros on his channel here
Interesting macro patterns
- Seen in smol
#![allow(unused)]

fn main() {
#[macro_export]
macro_rules! my_macro {
    ($($expr:tt)*) => {
        $crate::MyStruct::myfunc(async move { $($expr)* }).await
    };
}

}
Cell
Reference Video | Rust doc - cell (module), Cell (struct)
- Allows mutable sharing
- No one has a reference to the thing inside a cell. so anyone can modify the cell itself
- Does not implement
Sync - can get the value only if:
- you have a mutable reference to it (at which point you dont really need a cell)
- the type inside implements
Copy
- therefore a cell is usually used for small
Copytypes - useful for when you want multiple things referencing the same thing in a single threaded system
- Technically all the magic of a
Cellis done int theUnsafeCellimplementation The compiler has extra info aboutUnsafeCelland considers it differently. This allows for such behaviour. UnsafeCellimplements!Syncand a bunch of other featuresUnsafeCellalso allows us to get an exclusive, mutable reference from a shared reference. This is allowed because the compiler trusts the guy :)
RefCell
-
Unlike other types where the borrow checking is done at compile time, RefCell allows us to check whether anyone else is mutating at run time
-
In essence, it allows safe dynamic borrowing
-
Useful in cases where data is not known at compile time: traversal of graphs and trees
-
Refcell is also implemented using
UnsafeCell -
The structure has a way to keep track of how a value is borrowed
-
From the video, a rough implementation of the structure would look like this:
#![allow(unused)] fn main() { // uses this to keep track of how its borrowed enum RefState { Unshared, // noone has a reference Shared(usize), // there are n shared references Exclusive, // someone has an exclusive reference } struct RefCell<T> { value: UnsafeCell<T>, state: RefState, } } -
The basic api should be something like:
borrow_mut() -> Option<&mut T>returnsNoneif it has already been borrowed (exclusive/shared)borrow() -> Option<&T>returnsNoneif there has already been an exclusive borrow
( there signatures are for understanding. the actual types will differ )
-
But now, we see that its not possble to implement this api directly with a simple
RefStatebecause we would have to mutate the state with a shared reference. -
Here, wrapping the state in a
Cellwould solve the problem. BecauseCellallows us to mutate using a shared reference. Thus the structure becomes:#![allow(unused)] fn main() { struct RefCell<T> { value: UnsafeCell<T>, state: Cell<RefState>, } } -
This means that
RefStatewould have to implement theCopytrait too -
Also, similar to
Cell,RefCellis not thread safe -
In practice, if we are implementing
RefCellourselves, we would return custom types, sayRefandRefMutfor theborrowandborrow_mutmethods. Now, we can have our own impls for theDrop,DerefandDerefMuttraits on these new types to keep our state updated. This allows us to gurantee safety for our implementation
Do check the video referenced above for the implementations and more explanation.
Rc
Reference Video | Rust docs rc module , Rc struct
-
Rc: sigle threaded reference counting pointers -
not
Sync, notSend. ie: not thread-safe -
Rckeeps count of the references. when the last reference is dropped, the value inside is also dropped -
cannot get a mutable reference to the inside unless we use a
CellorRefCellinsideRc -
so
Rcdoesnt provide mutability, only provides a way to have multiple references to the same thing -
its a pointer to some type T, stored on the heap (cant be in a stack because if we have multiple references, whoose stack will have it?)
-
Useful when somethin need to be in multiple places. but who should have the ownership is not really clear. (eg: a config blob in a program)
-
The implementation, conceptually lokks something like:
#![allow(unused)]

fn main() {
// we create this inner value because the Rc itself should not hold the
// refcount if it did, each reference to Rc would have its own count
struct RcInner<T> {
    value: T,
    // here we wrap the usize in a cell because we need to
    // increment/decrement it withou having an exclusive reference
    // this is similar to how RefCell is made
    refcount: Cell<usize>,
}

// this is a pointer to a location on the heap. we use the RcInner type
// here the initial thought woulbe be to use a Box to hold the value but
// Cloning a box will also clone the thing inside it which we dont want
struct Rc<T> {
    // note that *const is a raw pointer
    // *mut and *const dont have the gurantees that & and &mut have; that
    // & -> noone has exclusive ref. &mut -> noone has shared reference
    // but that non-gurantee allows us to create what Rc provides ( multiple
    // things can have reference to the same thing )

    // but when using raw pointers, you can only dereference it using
    // an unsafe block and there is nothing much that you can do with it
    // besides that
    // [CHANGED] inner: *const RcInner<T>, : use NonNull
    inner: NonNull<RcInner<T>>,

    // This marker relates to the dropcheck issue (see point below)
    // This is needed for the completeness of an Rc implementation
    // but dropcheck is a bit complicated and I need more time :)
    // so I have not included it in this code snippet
    // _marker: PhantomData<RcInner<T>>


    // *const and *mut differs in that fot *mut, you _might_ be able to
    // get an exclusive reference and mutate it. but for *conts, its not
    // okay to mutate. so in general, its not possible to go from
    // a *const to an exclusive reference
}

impl<T> Rc<T> {
    pub fn new(v: T) -> Self {
        let inner = Box::new(RcInner {
            value: v,
            refcount: 1,
        });

        Rc {
            // notice that here we are not simple dereferencing the Box
            // like inner: &*inner. This is because the Box will get
            // dropped at the end of this scope. but we need the pointer
            // to still be valid. so we cast it into a raw pointer
            // [CHANGED] inner: Box::into_raw(inner), : use NonNull

            // SAFETY: Box gives a heap allocation, not a null pointer
            inner: unsafe{ NonNull::new_unchecked(Box::into_raw(inner)) },
        }
    }
}

// note that we don't require the type T to be Clone. because we dont
// actually Clone, we only want to increase the RefCount
impl<T> Clone for Rc<T> {
    fn clone(&self) -> Self {
        // [CHANGED] let inner = unsafe { &*self.inner }; : because NonNull
        // CHANGENOTE: NonNull gives us a as_ref method to dereference
        let inner = unsafe { self.inner.as_ref() };
        // inner.refcount += 1; this is essentially we want to do
        let c = inner.refcount.get();
        inner.refcount.set(c + 1);
        Rc { inner: self.inner  }
    }
}

// We also need to impl Deref so that methods on inner can be accessed
// transparently
impl Deref for Rc<T> {
    type Target = T;
    fn deref(&self) -> &Self::Target {
        // SAFETY: self.inner is a Box that is only deallocated when the
        // Rc goes away. here we _have_ an Rc, therefore the Box has not
        // been deallocated. so dereferencing here is fine
        // [CHANGED] &unsafe { &*self.inner }.value : because NonNull
        // CHANGENOTE: NonNull gives us a as_ref method to dereference
        &unsafe { self.inner.as_ref() }.value

    }
}

impl Drop<T> for Rc<T> {
    fn drop(&mut self) {
        // [CHANGED] let inner = unsafe { &*self.inner }; : because NonNull
        // CHANGENOTE: NonNull gives us a as_ref method to dereference
        let inner = unsafe { self.inner.as_ref() };
        let c = inner.refcount.get();
        if c == 1 {
            // we are dropping inner here because inner lives till the end
            // of this drop function. but when we drop the Box in the
            // following line, this pointer gets invalidated. this is just
            // to make sure that we dont accidently use it again.
            drop(inner);
            // here we get back a box from the pointer, which gets dropped
            // immediately

            // [CHANGED] let _ = Box::from_raw(self::inner);

            // CHANGENOTE but we cant just do this with a *const pointer.
            // because as mentioned above, *cont can have multiple
            // references. so the compiler doesnt know if its okay to drop.
            // the actual details are a bit subtle. the concept of
            // _Varience_ in rust ties into it(look into it). Therefore we
            // need to use a NonNull to get a *mut from a Box::from_raw()
            // this caused CHANGEs above, wrapping our box in NonNull

            // Now, NonNull gives us a method as_ptr() to get a *mut

            // SAFETY: at this point, we are the _only_ Rc that is left
            // and we are getting dropped. after this, there wont be any
            // Rcs and no references to T
            let _ = unsafe { Box::from_raw(self::inner.as_ptr()) };
        } else {
            // there are other Rcs. so we do not drop the Box
            inner.refcount.set(c - 1);
        }
    }
}
}
Limitations of this implementation of Rc
- Note that there are still issues in this implementations regarding dropcheck Jon did cover it a little in his stream but Its better to look more into it before writing. It would also make this example less complicated. Learch more about dropcheck in rust in thenomicon
- Note that in the std lib implementation od
Rc, it allows theTto be unsized:pub struct Rc<T> where T: ?Sized {}. Rust normally requires all generic arguments to be Sized. This requires some unstable features to implement ourselves and gets a bit complicated. So its is not covered here. Lookup "Coerced unsized trait" for more info on supporting dynamically sized types - We dont explicitly mark
Rcas notSendandSyncbecause NonNull is notSend
Sync Primitives
RwLock (Reader Writer Lock)
- An
RwLockis basically aRefCellwhose counters are kept using atomics - the
read(borrow equivalent for RefCell) andwrite(borrow_mut equivalent of Refcell) always return the ref/refmut instead of an option so that we dont have to manually poll in a loop. They block the current thread till its available if the borrow cannot succeed yet
Mutex
- A
Mutexcan be considered as a simplified version ofRwLockwhere ther is only borrow_mut. So aMutexdoesnt have to keep a state to count the no. of readers becuse its either we have the reference or someone else has it.Mutexalso blocks the thread till it gets a value
Arc (Atomic reference counted)
Reference Video timestamp | Rust doc Arc
- Thread safe reference counting pointer
- Almost similar to
Rcexcept that it uses thread safe atomic operations to manage the reference count
Condvar
- Provides a way to wait/block a thread and wake it up without using up cpu cycles
- When paired with a mutex, we can use it to wake up the thread waiting for the mutex at the same time as when we release the lock. This requires that we currently holds the lock on the mutex.
Cow
Borrow module
Ref video timestmap | Rust Doc
Cow
-
A
Cowis a Clone on write smart pointer -
Its and enum which is either
BorrowedorOwned -
So
Cow<T>either contains aBorror<T>or ownsT -
a
CowimplementsDeref. So if it holds a reference, it just passes-through the access. If it owns the value, the reference is returned -
If we try to modify the value in a
Cowand:- if it owns the value, it simply does the modification
- if its a borrowed value/shared reference, it can't directly modify it
so it clones the value and turns it into the
Ownedversion and gives us a mutable reference
-
Useful in cases where we only sometimes need to modify a value. eg: a string escaping function
#![allow(unused)] fn main() { // Without using cow, the function would look something like this: // fn escape<'a>(s: &'a str) -> String // but for a string that does not need to be escaped, allocating a String // is wasteful. A Cow allows us to Clone only when its necessary // so the function becomes something like: fn escape<'a>(s: &'a str) -> Cow<'a, str> { if already_escaped(s) { Cow::Borrowed(s) } else { let mut string = s.to_string(); // modify (escape) string here Cow::Owned(string) } } } -
a real world example is where the
from_utf8_lossyfunction onStringsreturns aCow<str>. It returns aBorrowedif the string is valid utf-8. Otherwise, it converts it into aVecand replaces all invalid chars and returns thatOwnedvalue. This is a great example whereCowlets you not to modify when not needed.
Box
- Is a Smart Pointer
- Used to allocate things on the heap
QuickNotes
The Unsafe Chronicles: Exhibit A: Aliasing Boxes
std::mem::transmute: dont use unit absolutely necessary. you can do reaaaly unsound things with thisstd::mem::ManuallyDrop: Prevents callingT's destructor. Allows us to provide our own drop rulesstd::mem::MaybeUninit: Wrapper that says that the content might not be valid yet. Usually the compiler has some rules that are always upheld and thus make optimizations for it. MaybeUninit signals the compiler to assume nothing about the type and thus prevent these optimizations.repr(transparent)std::marker::PhantomData: Used to carry around info at compile time. Is 0 sized. Also check the nomicon
Unix
Useful notes on unix / linux commands
Links
Apparently everything has a handbook now
Zsh
$ZDOTDIR : Root directory for user level zsh configuration. Usually set to ~
$ZDOTDIR/.zshenv : For setting env variables. This is always read
$ZDOTDIR/.zprofile : Read on login shells. Useful to startup window
managers
$ZDOTDIR/.zshrc : Read on interactive shells. This is always read when
starting a shell unless -f added
$ZDOTDIR/.zlogin : read at the end of login process. Useful for starting cli
daemons/utilities
$ZDOTDIR/.zlogout : read when login shell exits. Can be used to
unset variables
Each of these files can have a system-wide counterpart at /etc/zsh
Some cool tips
- Add
typeset -U PATH pathto your.zshenvor.zshrcto remove duplicates from thePATHvariable [Note: zsh auto syncs path with PATH. Hence using -U on both variables] - ZSH Custom widgets and shortcuts with zle and bindkey
IRC - Internet Relay Chat
IRC is a low-bandwidth method of communication. IRC is very similar to text messaging, but designed around communicating with large groups of users instead of one on one. People familiar with discord can consider it to be the predecessr of discord and many other similar messaging applications.
IRC has different networks of servers, to which a client may connect to. The
different networks hosts different channels in them.
Channel names usually start with a # sign
Each user on irc is identified by a nick or a nickname. A user may have
multiple nicknames associated to him, to prevent conflicts on different
channels.
Weechat
Weechat is an irc client that is extremely customisable. And since its termial app, it can be put in a tmux session, even on servers. Irssi is also a good alternative but I liked weechat a bit better
Now, weechat does support mouse mode, and its nice to have enabled. but in some cases you just want to use the keyboard. But keyboard shortcuts are easy to forget if you take a break from using them.
Useful Links
- The Weechat user manual
- Get Started on IRC
- Here is a list of useful keyboard bindings for weechat
- A nice guide and introduction to weechat
- Good weechat config to steal stuff from 😏
- IRC CheatSheet
Pandoc
Filters
pandoc-citeproc: Manage citationspandoc-crossref: Manage references and numbering
Latex
Generate template using
pandoc -D latex
Makefile Example
FILES = NOTE.md \
		meta/common.yaml

OUTPUT = build

FLAGS = -s \
		-F pandoc-crossref\
		-F pandoc-citeproc\
		--toc \
		--bibliography bib.bib

all: pdf pre

pdf:
	pandoc -o $(OUTPUT)/output.pdf $(FLAGS) $(FILES) meta/pdf.yaml
pre:
	pandoc -o $(OUTPUT)/presentation.pdf -t beamer $(FILES) meta/presentation.yaml

clean:
	rm build/*
Metadata files
common.yaml
---
title: Hello World
author: Edvin basil Samuval
---
pdf.yaml
---
keywords:
  - one
  - two
  - three
numbersections: yes
lang: en
babel-lang: english
autoEqnLabels: true
geometry:
- top=30mm
- left=25mm
- right=25mm
- bottom=30mm
abstract: |
    Eyy
    Wassap

---
presentation.yaml
---
theme: Berkeley
colortheme: seahorse
---
Docker
Writing dockerfiles
- try to use a smaller base image for prod. usually alpine is a a good choice unless you have distro specific features that you need
- Specify the version tags for the image explicitly.
eg
nginx:1.4-alipne3.1 - use a non-root user for most tasks especially the execution process
- use multi stage builds to reduce the size of the final image. eg:
# ----- Initial stage with build dependencies ------

FROM node:12.10.4-alpine3.2 AS builder

# Specify ENV vars here
# Specify WORKDIR here if needed
# do the required COPY here
# RUN pre-exec scripts here

# ... do build steps here
# specifying a seperate user here is not really necessary for multistage
# containers since they dont really affect the final runtime

# --------------- NEXT STAGE-----------------

FROM alipne:3.2 as runtime

USER 1000

# Specify all the above (workdir, envs, etc here)
WORKDIR /app

# copy over any non-dependent files/static assets here
COPY static/ static/
# copy files over from seperate stage
COPY --from=builder /app/build/mybin /app/mybin

# expose the required port here
EXPOSE 8888

# Specify the final runtime command
CMD [ "/app/mybin" ]
Kubernetes
Kubernetes is a container orchestration engine
Basic terminology
- node: A single VM or physical machine running kubernetes. There can be master nodes and worker nodes
- pods: smallest deployable unit in a cluster. can consist of multiple containers
- replica set: gurantees a number of pods are up at any given time
- deployments: defines a desired state of pods. uses replication controllers
- services: rules to expose a deployment. provides virtual network addresses
- volumes: provides persistency and file sharing between pods
- namespace: a way to split a cluster into seperate virtual clusters
Useful commands
get x -o wide[ get more info , eg for pods show its ip]create x -o yaml --dry-run > file.yml, edit and apply backhelm inspect values stable/nnextcloud > values.ymlgets the values filehelm install my_name -f values.ymlto specify the values fileservice: type NodePortto use in ingress controllerpersistentvolumeclaimsto create claims, which can be fullfilled by the providerport-forward <resource> locport:remoteportkubectl edit <resource>: easy editing deploymentskubectl exec -it bash: interactive terminalkubectl explain <resource> [ --recursive ]: short documentation on resourcekubectl get resourcequota: get limits for each resource
Kubernetes Resources
- Examples for writing yamls
Related
Ansibe Resources
Finding Docs (ansible-doc)
- To list alls the modules, use
ansible-doc -l - To view documentation for a particular module
ansible-doc ping
SaltStack
Documentation | Components overview | A guide by yet.org | Useful cheatsheet
Installation
Usually, you need to add the saltstack repo to your package manager repo list and install via the package manager. See the repo page for more info
For quick installation, use the salt-bootstrap script
curl -o bootstrap-salt.sh -L https://bootstrap.saltproject.io
# On the master
sudo sh bootstrap-salt.sh -M

# On the minion
sudo sh bootstrap-salt.sh

# Notable options
# -x python3 Use python3 for the install. Should be default on most distros but
#            just in case
# -L  Also install salt-cloud and required python-libcloud package
# -M  Also install salt-master
# -S  Also install salt-syndic
# -N  Do not install salt-minion
# -X  Do not start daemons after installation
# -A  Pass the salt-master DNS name or IP. This will be stored under
Default ports to open on the master:
- 4505 : publish port
- 4506 : return port
Manage salt-minion and salt-master using the systemd units salt-master.service
and salt-minion.service
Minion config (Reference)
master is where the mnion connects to, id is the identifier of the minion.
the fqdn of the host is ued if not specified.
# /etc/salt/minion
master: saltmaster.your.domain
id: saltminion-01
Alternatively, the id can be specified in the file: /etc/salt/minion_id
echo 'saltminion-01' > /etc/salt/minion_id
The id from the config file takes precedence
Accepting minions
The master needs to trust the minions connecting to it.
The salt-key command is used to manage this trust
Use salt-call --local key.finger to view the fingerprint of the minion and
cross-check from the master before accepting a minion
Accept the minion using salt-key -a saltminion-01
# Command quick reference

salt-key

# Options
# <none>         : same as -L
# -L             : lists all connections
# -l, --list ARG : Arg is one of (un[accepted],acc[epted], rej[ected], den[ied],all)
#
# -a <id>        : accept the minion with the given id
# -A             : accept all
#
# -r <id>        : reject the minion with the given id
# -R             : reject all
#
# -d <id>        : delete the minion with the given id
# -D             : delete all
#
# -p <id>        : print the public key
# -P             : print all public keys
#
# -f <id>        : print the fingerptint
# -F             : print all fingerprints
Salt commands
- salt-master : daemon used to control the Salt minions
- salt-minion : daemon which receives commands from a Salt master.
- salt-key : management of Salt server public keys used for authentication.
- salt : main CLI to execute commands across minions in parallel and query them too.
- salt-ssh : allows to control minion using SSH for transport
- salt-run : execute a salt runner
- salt-call : runs module.function locally on a minion, use –local if you don’t want to contact your master
- salt-cloud : VM provisionning in the cloud
- salt-api : daemons which offer an API to interact with Salt
- salt-cp : copy a file to a set of systems
- salt-syndic : daemon running on a minion that passes through commands from a higher master
- salt-proxy : Receives commands from a master and relay these commands to devices that are unable to run a full minion.
- spm : frontend command for managing salt packages.
Executing commands on the minion
The general structure to execute commands on the minion is
salt <target> <module.function> <arguments>
Test the connection to the minion using ping
salt '*' test.ping
Embedded documentation is available using
salt '*' sys.doc test.ping
View all commands on a module using
salt '*' sys.list_functions test
Useful commands
Note: mostly taken from this blog
List modules, functions etc
salt '*' sys.list_modules          # List all the preloaded Salt modules
salt '*' sys.list_functions        # List all the functions
salt '*' sys.list_state_modules    # List all the state modules
salt '*' sys.list_state_functions  # List all the state functions
Network related commands (reference)
salt '*' network.ip_addrs          # Get IP of your minion
salt '*' network.ping <hostname>   # Ping a host from your minion
salt '*' network.traceroute <host> # Traceroute a host from your minion
salt '*' network.get_hostname      # Get hostname
salt '*' network.mod_hostname      # Modify hostname
Minion Status
salt-run manage.status    # What is the status of all my minions? (both up and down)
salt-run manage.up        # Any minions that are up?
salt-run manage.down      # Any minions that are down?
Jobs
salt-run jobs.active               # get list of active jobs
salt-run jobs.list_jobs            # get list of historic jobs
salt-run jobs.lookup_jid <job_id>  # get details of this specific job
System
salt '*' system.reboot       # Let's reboot all the minions that match minion*
salt '*' status.uptime       # Get the uptime of all our minions
salt '*' status.diskusage
salt '*' status.loadavg
salt '*' status.meminfo
Managing packages
salt '*' pkg.list_upgrades   # get a list of packages that need to be upgrade
salt '*' pkg.upgrade         # Upgrades all packages via apt-get dist-upgrade (or similar)
salt '*' pkg.version htop    # get current version of the bash package
salt '*' pkg.install htop    # install or upgrade bash package
salt '*' pkg.remove htop
Managing services on the minion
salt '*' service.status <service name>
salt '*' service.available <service name>
salt '*' service.stop <service name>
salt '*' service.start <service name>
salt '*' service.restart <service name>
salt '*' ps.grep <service name>
Running ad-hoc commands
salt '*' cmd.run 'echo Hello World'  # Returns the output as a string
salt '*' cmd.run_all 'ls -la'        # Returns more info like return code, pid
                                     # etc as a dict
Targeting minions (Reference)
Glob matching
salt '*web*' test.ping
salt 'minion-*' test.ping
salt 'minion-??' test.ping
salt 'minion-0[1-9]' test.ping
Perl Regular expression matching
salt -E 'minion' test.ping
salt -E 'minion-.*' test.ping
salt -E '^minion-01$' test.ping
salt -E 'minion-((01)|(02))' test.ping
List matching
salt -L 'minion-01,minion-02,minion-03' test.ping
Grain and Pillar matching
Grains are static information regarding a minion. This include information about things like the OS, cpu architecture, kernel, network state etc.
To view all the grains availabe for the minions, use
salt '*' grains.items
To get the value of a grain, use
salt '*' grains.get osfullname
Grains can be added and deleted using
salt '*' grains.setval web frontend
salt '*' grains.delval web
To target minions based on grains, use:
# Use --grain or -G to match on grains
salt -G 'os:Ubuntu' test.ping

# Use --grain-pcre or -P for perl style regex on grains
salt -P 'os:Arch.*' test.ping
Pillars are secure user-defined variables stored on master and assigned to minions
Operations on pillars are similar to the ones for grains
salt '*' pillar.items
salt '*' pillar.get hostname
To traget minions based on pillars, use:
# Use --pillar or -I to match pillars
salt -I 'branch:mas*' test.ping

# USe --pillar-pcre or -J for perl style matching on pillars
salt -J 'role:prod.*' test.ping
Matching using IP addresses.
# Use -S or --ipcidr to match using IP cidr notation
salt -S 192.168.40.20 test.ping
salt -S 10.0.0.0/24 test.ping
Compound matching. This combines all of the above types of matching
salt -C 'minion-* and G@os:Ubuntu and not L@minion-02' test.ping

# The different lettes correspond to each matching type
# G Grains glob
# E Perl regexp on minion ID
# P Perl regexp on Grains
# L List of Minion
# I Pillar glob
# S Subnet/IP address
# R Range cluster
In state or pillar files, matching looks like:
'192.168.1.0/24':
  - match: ipcidr
  - internal
Nodegroups are user-defined groupings of your minions. They are like aliases
for matching your nodes. Nodegroups can be defined in the /etc/salt/master
file using compound statements
nodegroups:
  group1: '[email protected],bar.domain.com,baz.domain.com or bl*.domain.com'
  group2: 'G@os:Debian and foo.domain.com'
  group3: 'G@os:Debian and N@group1'
  group4:
    - 'G@foo:bar'
    - 'or'
    - 'G@foo:baz'
The master needs to be restarted after defining the nodegroups. They can then be used as follows:
salt -N group1 test.ping
A batch size can be useful fo rolling out updates
# syntax:
# -b BATCH, --batch=BATCH, --batch-size=BATCH
# where BATCH is a percentage or an absolute number
salt -G 'os:Debian' --batch-size 25% apache.signal restart

# --batch-wait=BATCH_WAIT Wait the specified time in seconds after each job
# done before freeing the slot in the batch for the next
# one.
Confuguration management
State modules are declarative and idempotend, unlike normal modules so far, which are iterative. Thus state modules are useful for configuration management.
As mentioned above, To list all available state modules, use
sys.list_state_modules
List the functions available on a state module
salt '*' sys.list_state_functions pkg
Get documentation on any of them
salt '*' sys.state_doc pkg.latest
We use state files (.sls) to describe the desired state of our minions.
States are stored in text files on the master and transferred to the minions on demand via the master's File Server. The collection of state files make up the State Tree.
The file_roots property in /etc/salt/master specifies the directories used
by this file server.
Restart the salt-master after editing this
Eg. Create the file /srv/salt/tools.sls (make the parent dir if necessary) to
install the following tools on our minions
tools:
  pkg.latest:
    - pkgs:
      - iftop
      - vnstat
      - htop
      - curl
      - vim
      - logwatch
      - unattended-upgrades
      - fail2ban
Aplly the state using:
salt '*' state.sls tools
This will apply the state to each minion individually. This works bu is not really efficient.
A top.sls file is placed on the top of the state tree. It is used to map groups of minions to their configuration roles.
Top files have three components:
- Environment: A state tree directory containing a set of state files to configure systems.
- Target: A grouping of machines which will have a set of states applied to them.
- State files: A list of state files to apply to a target. Each state file describes one or more states to be configured and enforced on the targeted machines.
The relationship between these are nested. Environments contain targets, Targets contain states
Consider the following top file. It describes a scenario in which all minions with an ID that begins with web have an apache state applied to them.
base:          # Apply SLS files from the directory root for the 'base' environment
  'web*':      # All minions with a minion_id that begins with 'web'
    - apache   # Apply the state file named 'apache.sls'
To apply all states configured in your top.sls file just run
salt '*' state.apply

# use test=True for a dry run
salt '*' state.apply test=True
The states that will be applied to a minion in a given environment can be viewed using the state.show_top function.
salt '*' state.show_top
Pillars
Pillars are tree-like structures of data defined on the Salt Master and passed through to minions. They allow confidential, targeted data to be securely sent only to the relevant minion.
Similar to the state tree, the pillar is comprised of sls files and has a top
file. The default location for the pillar is in /srv/pillar. This location can
be configured via the pillar_roots option in the master configuration file.
Note: It must not be in a subdirectory of the state tree or file_roots
Example usage of pillars:
# /srv/pillar/top.sls:

base:       # Enviornment
  '*':      # Target
    - data  # Apply the state file named data.sls
# /srv/pillar/data.sls
info: some data
Now, instruct the minions to fetch pillar data from the master
salt '*' saltutil.refresh_pillar
pillar.item Retrieves the value of one or more keys from the in-memory pillar data.
All pillar items can be retrived using pillar.items. This compiles a fresh pillar dictionary
and displays it, but leaves the in-memory
data
untouched. If pillar keys are passed to this function, it acts like pillar.items
and returns from the in-memory data
salt '*' pillar.items
pillar.raw is like pillar.items, it returns the entire pillar dictionary, but
from the in-memory pillar data instead of compiling fresh pillar data.
Individual items may be fetched using
salt '*' pillar.get info
The data can be accessed from state files using the syntax:
# simple data
{{ pillar['info'] }}

# more complex/nested data
{{ pillar['users']['foo'] }}

# providing defaults
{{ salt['pillar.get']('pkgs:apache', 'httpd') }}
See the official docs for using more complicated data
Pillar data can be parameterised using grain data
# /srv/pillar/pkg/init.sls
pkgs:
  {% if grains['os_family'] == 'RedHat' %}
  apache: httpd
  vim: vim-enhanced
  {% elif grains['os_family'] == 'Debian' %}
  apache: apache2
  vim: vim
  {% elif grains['os'] == 'Arch' %}
  apache: apache
  vim: vim
  {% endif %}
Add pkg to /srv/pillar/top.sls. Now, this data can be referenced in state files
# /srv/salt/apache/init.sls
apache:
  pkg.installed:
    - name: {{ pillar['pkgs']['apache'] }}
Read more about merging keys and namespace flattening here
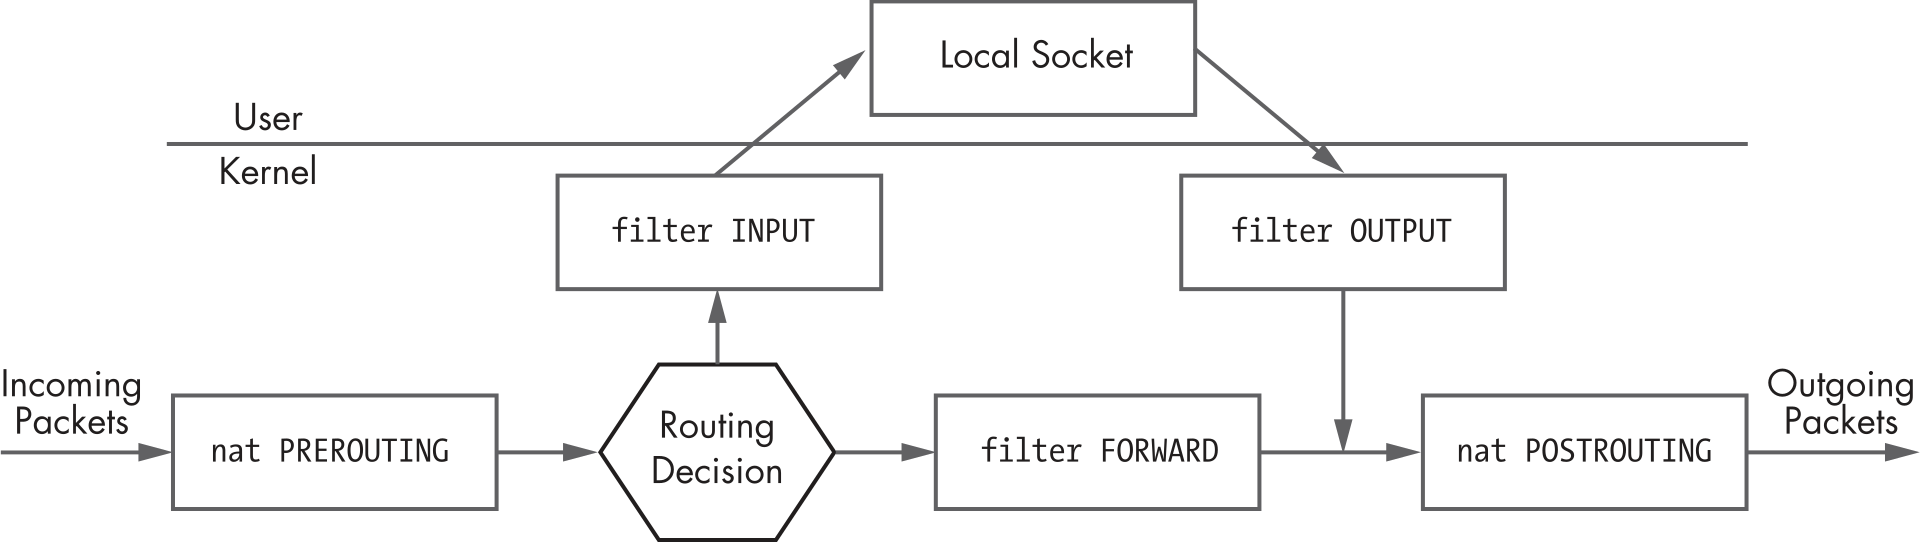
iptables
Here is a helpful illustration of the basic flow of a network packet.
Hardening nginx
nginxconfig.io has a great tool to generate secure configs.
The basic ones are:
# turn server tokens off
server_tokens off;

# generating custom dh params
# sudo openssl dhparam -out /etc/nginx/dhparam.pem 2048
ssl_dhparam          /etc/nginx/dhparam.pem;

# hide headers that can leak info
proxy_hide_header X-Powered-By;
proxy_hide_header X-Generator;

# Secure SSSL ciphers and protocols
ssl_protocols TLSv1.2 TLSv1.3;
ssl_ciphers "EECDH+ECDSA+AESGCM EECDH+aRSA+AESGCM EECDH+ECDSA+SHA384 EECDH+ECDSA+SHA256 EECDH+aRSA+SHA384 EECDH+aRSA+SHA256 EECDH+aRSA+RC4 EECDH EDH+aRSA HIGH !RC4 !aNULL !eNULL !LOW !3DES !MD5 !EXP !PSK !SRP !DSS";
ssl_prefer_server_ciphers on;
ssl_session_cache shared:SSL:50m;
ssl_session_timeout 5m;
Reverse proxy common settings
#/etc/nginx/snippets/rp.conf
proxy_http_version                 1.1;
proxy_cache_bypass                 $http_upgrade;

# Proxy headers
proxy_set_header Upgrade           $http_upgrade;
proxy_set_header Connection        "upgrade";
proxy_set_header Host              $host;
proxy_set_header X-Real-IP         $remote_addr;
proxy_set_header X-Forwarded-For   $proxy_add_x_forwarded_for;
proxy_set_header X-Forwarded-Proto $scheme;
proxy_set_header X-Forwarded-Host  $host;
proxy_set_header X-Forwarded-Port  $server_port;

# Proxy timeouts
proxy_connect_timeout              60s;
proxy_send_timeout                 60s;
proxy_read_timeout                 60s;
TCP forwarding
stream {
    server {
             listen 2201;
             proxy_pass 192.168.1.99:22;
    }
}
or
stream {
    upstream myapp {
        server 127.0.0.1:8000 weight=3;
        server 192.168.1.2:80;
        server 192.168.1.3:80;
    }

    server {
             listen 8080;
             proxy_pass myapp;
    }
}
More info at ngx_http_upstream_module docs
On ubuntu 18.04, package available as libnginx-mod-rtmp
To consume as rtmp and retransmit
rtmp {
	server {
	listen 1935;
	chunk_size 4096;

	application live {
		live on;
		record off;
		interleave off;
		wait_key on;
		meta on;
		wait_video off;
		idle_streams off;
		sync 300ms;
		session_relay on;
		#allow publish 127.0.0.1;
		#allow publish 192.168.2.0/24;
		allow publish all;
		#deny publish all;
		allow play all;

        # Multistream to these endpoints
        # push rtmp://live-ams.twitch.tv/app/LIVESTREAM_KEY;
        # push rtmp://a.rtmp.youtube.com/live2/LIVESTREAM_KEY;
        # push rtmp://ingest-ams.mixer.com:1935/beam/LIVESTREAM_KEY;
		}
	}
}
To playback as dash/hls
rtmp {
    server {
        listen 1935; # Listen on standard RTMP port
        chunk_size 4096;

        application show {
            live on;
            # Turn on HLS
            hls on;
            hls_path /tmp/hls/;
            hls_fragment 3;
            hls_playlist_length 60;
            # disable consuming the stream from nginx as rtmp
            deny play all;
        }
    }
}
Dash playback
server {
    listen 8080;

    location /hls {
        # Disable cache
        add_header Cache-Control no-cache;

        # CORS setup
        add_header 'Access-Control-Allow-Origin' '*' always;
        add_header 'Access-Control-Expose-Headers' 'Content-Length';

        # allow CORS preflight requests
        if ($request_method = 'OPTIONS') {
            add_header 'Access-Control-Allow-Origin' '*';
            add_header 'Access-Control-Max-Age' 1728000;
            add_header 'Content-Type' 'text/plain charset=UTF-8';
            add_header 'Content-Length' 0;
            return 204;
        }

        types {
            application/vnd.apple.mpegurl m3u8;
            video/mp2t ts;
        }

        root /mnt/;
    }
}
Expose rtmp stats on an endpoint
location /stat {
    rtmp_stat all;
    rtmp_stat_stylesheet stat.xsl;
}
location /stat.xsl {
    root /var/www/html/;
}
#location /control {
# you'll need a htpasswd auth file, that's outside the scope of this doc but any apache one will work
# auth_basic "stream";
# rtmp_control all;
#}
Security
LSM: Linux Kernel Security Modules.
Inserts hooks at every point in the kernel where a user can conduct a system call to import kernel objects.
DAC: Discretionary Access Control : Default linux permissions MAC: Mandatory Access Control
AppArmor
Is an LSM that allows the user to restrict programs with the use of a profile specifiv to that application. These profiles are designed to delegate capabilities that include sockets, network access, file access and more.
Provides MAC on top of DAC
Enabling apparmor
#: /boot/syslinux/syslinux.cfg

APPEND apparmor=1 security=apparmor
Comes with sane defaults and have profiles for certain applications
Useful links
- https://wiki.archlinux.org/title/AppArmor
- The Comprehensive Guide To AppArmor
SELinux
Defines the access and transition rights of every user, application, process and file on the system.
Functioning:
- A process will perform an action request. (eg:to read a file)
- THe request is pushed to the SELinux security server
- The security server checks an Access Vector Cache (AVC) that stores subject and object permissions.
- If request not found therem it will consult the SELinux Policy Database.
- If the policy is found, It makes a decision of Yes or No for the access request.
- If yes, the object requested is returned. Else an AVC denied message is generated and the object is not returned
Useful links
- Redhat: SELinux User's and Administrator's Guide
- https://wiki.archlinux.org/title/SELinux
Firejail
Uses linux namespaces in conjunction with seccomp-bpf to restrict the running enviornment of the application.
It comes with security profiles for a lot of applications in /etc/firejail.
SELinux
Mostly notes from Security-Enhanced Linux for mere mortals by Thomas Cameron | Redhat: SELinux User's and Administrator's Guide | The arch wiki article
SELinux policy:
The policy can be found at /etc/selinux/config,
which is also symlinked to /etc/sysconfig/selinux
SELINUX= can take one of these three values:
    enforcing - SELinux security policy is enforced.
    permissive - SELinux prints warnings instead of enforcing.
    disabled - No SELinux policy is loaded.

SELINUXTYPE= can take one of three values:
    targeted - Targeted processes are protected,
    minimum - Modification of targeted policy. Only selected processes are protected.
    mls - Multi Level Security protection.
It can also be seen via sestatus
The current mode can be viewed using getenforce
Labeling
Files, Ports etc are labelled with an SELinux context. for files and directories, extended attrs are used to store these labels while kernel manages the labels for processes and such.
They are of the format
user:rele:type:level(optional)
The user above is the selinux user and is different from the normal linux
user
just the type can be used for basic usecases
selinux adds the -Z option to several commands to view the labels associated
with the associated resources. A few of them are:
ls -Zid -Zps -Znetstat -Z
Type Enforcement
The types in the labels are usually related for resources that belong together.
Eg. for apache, the following types are observed:
httpd_config_tfor its config directoryhttpd_log_tfor its log directoryhttpd_sys_content_tfor the webroothttpd_initrc_exec_tfor the init scripthttpd_tfor the process
Type enforcement is the part of the policy that says, for instance, “a process running with the label httpd_t can have read access to a file labeled httpd_config_t"
Working with labels
chcon or restorecon may be used to change the context of a file
When a file is created, it inherits the context of its parent (wiht a few exceptions)
The login process sets the default context, which is unconfined for the
targeted policy
-
File transitions (defined by policy) may be set such that if an application foo_t creates a file in a directory labeled bar_t, it ges the baz_t label.
-
getsebool -ashows all booleans available -
use
setsebool <boolean_name> <0|1>to set the boolean temporarily- use the
-Pargument with it to make the change persistent
- use the
Tip: Install
setroubleshootandsetroubleshoot-serveron machines used to develop policy modules. Reboot or restart auditd afterwards. This will make the logs in/var/log/messagesmore human-readable
The SELinux logs tells you what to do in most cases
A good place to check for currently actiove booleans is the booleans.local
file under /etc/selinux/targeted/modules/active/.
Note: editing this file will not change anything.
Modifying policies using setsebool or other commands regenerates the
/etc/selinux/targeted directory. So sont bother changing anything in there.
use man chcon so see how to change the labels.
Usually to change just the type, use chcon -t my_type_t /path/to/file
-
Or even just use
chcon --reference /known/good/file /path/to/target/fileto -
use the refernce file's security context
-
Or maybe you just need to restore the context to its defaults. In this case, use
restorecon. eg:restorecon -vR /path/to/file-vis for verbose-Ris recursive- read man btw
restorecon(8)
-
restoreconuses information from the/etc/selinux/targeted/contexts/files/file_contexts(*)files to determine what a file or directory's context should be -
to add a new default context to be used, we use
semanage fcontext -a -t my_type_t "/foo(/.*)?"fcontext: for file contextman semanage-fcontext(8)-ato add-tfor type
-
or simply
semanage fcontext -a -e /known/good/file/ /foo/"-efor equal
-
dont forget to use
restoreconto apply the changes from the default context that was just set -
When working on creating a polllicy, a good way is to use a
permissivemode for SELinux to simply log the messages. Then after going through the usage of the application, use something likegrep httpd /var/log/audit/audit.log | audit2allow -M mymodulelocalto create a new policy based on the audit. Then usesemodule -i mymodulelocal.ppto install (-i) the module -
audit2whycan be used in a similar fashion toaudit2allowto get a human-readable descriptions of the audits
Enabling SELinux on a new system
Setting selinux to enforcing usually doesnt end so well
So first set it to permissive, touch a file called .autorelabel to the root of
the filesystem and reboot. This will relabel the whole filesystem to work with
selinux
After its done relabelling, set SELinux to enforcing
AppArmor
Official Website | Docs | Wiki
Install the apparmor-utils package as well
Some common commands are:
aa-enabled: Is apparmor enabled or notaa-status: Display the status of profile enforcementaa-genprof: Create an apparmor profileaa-logprof: Update and existing profileaa-complain: Set a profile in complain modeaa-enforce: Set a profile in enforce modeapparmor_parser <-r|-a> /path/to/profileto reload or add a profile
A profile in apparmor can run in various modes:
complain: Apparmor allows a process to perform almost all tasks but will log them as events in the audit log. It will still enforce any explicit deny rules in a profile.unconfined: Allows a program to perform any task and will not log itenforced: Apparmor enforces the rules specified in the profile
Common apparmor permissions
r: readw: writek: lockux: unconstrained executeUx: unconstrained execute -scrubpx: discrete profile executePx: discrete profile execute -scrubix: inherit executecx: local seecurity profilel: linka: appendm: memory map
Apparmor profiles are stored in /etc/apparmor.d by default
It also adds the -Z option to commands like ps to show what profile is being
used in different applications and in what mode
Networks
Learning computer networks. Notes on labbing, and other resources based mostly on cisco guides.
Cisco IOS on VIRL2/CML
Commands for router (or switch)
?displays all the commands availableenableorentakes us into privilleged modeenable ?and tabbing would show other options for the enable command
configure terminalorconf tto change the configuration. (global config mode)host R1to set the hostname toR1interface gigabitEthernet 0/0/0to select the interfaceno shutdownto enable the interface. By default, router interfaces are shutdown.ip address 10.1.1.1 255.255.255.0to configure the ip addressendto exit from config mode, back to the privilleged shell- try to
ping 10.1.1.1(self) from the enable/privilleged mode copy running-config startup-configsaves the config as the startup configwris an older command to write the configsh run(show run) to see the running config of the routershow ip int br(show ip interface brief) for brief overview of all interfacesshow arpshows the arp tableshow usersshows the logged in sessions and some connection info- from a router, simply typing an ip would try to telnet to that ip
show ip routeto see the routing tables- if this shows "Default gateway is not set", maybe ip routing is just not
enabled. go to
conf tand useip routingto enable it
- if this shows "Default gateway is not set", maybe ip routing is just not
enabled. go to
- if youre not getting any console messages, you can specify to show those in
the current session by using
terminal monitorin the enable mode - if you wanna configure 2 interfaces the same way, it can be done using
interface range gig 0/0, gig 1/2. any configuration will apply to both these interfaces. (prolly dont need for now). you could also do something likeint range gig 0/1-2
Routing
- cisco routers usually have ip routing enabled. (because its a router. duh). A
multi-layer switch can route for others but routing is not enabled by default.
this can be turned on using
ip routing - most configurations can be disabled by prepending a
nobefore the command. so for eg, to disable routing, it would beno ip routing - a default gateway can be configured for a switch using
ip default-gateway 10.0.1.1. note that this is different from default route for routing decisions. default gateway is for devices that dont route for others. default route is for a frustrated router that has no other choice :). verify that the gateway was set usingshow ip route - for a device that does ip routing, a default gateway is not used. it used the
default route for routing packets that it doesnt know of. ip routing is
usually done by routers, but an L3 switch can also act as a router by enabling
ip routing. - Routing can be done using
- Directly connected interfaces
- Static routes
- Dynamic routing using protocols like ospf (see ospf)
NAT/PAT
-
To create a pool of ips, use
ip nat pool MY-POOL 1.1.1.1 1.1.1.254 netmask 255.255.255.0. The netmask can also be replaced by theprefix-length /24 -
Now we need an access list to match ips for out NAT rules
-
show access listshows the access list useful to setup rules / for setting up NAT/PAT -
Add rule to access list to specify which addresses to nat by using
access-list 1 permit 172.16.0.0 0.0.255.255on conf t mode. Note that the last field is the wildcard bit and not a mask. Note that a standard access list can only match on source ip address information. For NAT, this is all we really need. Extended ACLs can match on source/destination ip address and ports, and even match on different layer 4 protocols like tcp/udp. -
specify the inside and outside interfces using
int gig 0/0->ip nat outint gig 0/1->ip nat inside
-
specify the nat rule using
ip nat inside source list 1 interface gig 0/0 overload. g0/0 is the outside interface. overload specifies to use PAT to allow a lot of devices. -
verify the translations working with
do show ip nat translations -
1:1 NAT is static
-
N:N (pool to pool) is dynamic
-
N:1 is overload or PAT
NAT lingo

- Inside Local: Inside ip from larry's perspective: his ip
- Outside Local: Outside ip from Larry's perspective: google's ip
- Inside Global: Inside ip from google's perspectie: router's external-facing ip
- Outside global: Outside ip from google's perspective: google's ip
- anytime you see local, its larry's perspective. and anytime you see flobal, its google's perspective
Outside nat (this can get ugly ;p)
- to set the rule, use
ip nat outside source static 192.168.1.100 10.16.6.100 add-route- the format is
ip nat outside source static <outside global> <outside local> add-route - outside local is the ip of google from google's perspective. outside local is ip of outside(google) from larry's perspective (that he believes), which in case of outside NAT will be the ip after the NAT that he will go to to visit google.
- the
add-routeis needed here because both the ips (larry's and natted 10.16.6.100) are on the LAN side. so by default, the router does not have to forward it (same network so why forward). But for NAT to occour, there must be routing. add-route adds a 32 bit static route for this, which will look something like10.16.6.100/32 [1/0] via 192.168.1.100
- the format is
OSPF
- Routers need to agree on the following to form neighbourships:
- Timers: hello messages etc
- Network/subnet
- Authentication
- DR for the segment
- Area type (for CCNA, usually single area - the backbone). other area types like stub areas exist
- DRs not needed for p2p (or point to multipoint) links (serial), They go into full adjacency with everybody.
- DRs only needed
- In a usual network, the routers have an LSA of type 1. the DR will have an LSA of type 2 which will have its own information, its network and also the connected routers
- In case its the only router in the network, it will connect itself to "stub"
area and not generate LSA type 2s. this can be verified by viewing the
database
show ip ospf database. When another router shows up, it will start advertising the LSA typ2 2s and switch from stub to a Transit area, where there are multiple ospf speakers - Note that if there is only one router and that is the DR, it will not generate a tye 2 LSA (because its unnecessary). So type 2 LSAs are used only when there are 2 or more routers present (running ospf) on that network
show ip protocolsshaows what all routing protocols are runningshow ip ospf int brieffor info on ospf interfaces (can be used to check full adjacency)- in
conf tmode,do show ip protocolshows the routing protocols. (lets say we have ospf 1) - go to ospf 1 manage using
router ospf 1 router-id 111.111.111.111to set the ospf router id. this must be unique across neighbours- specify the network using
network 10.0.12.0 0.0.0.255 area 0to set it to the area. this will make the router check all its inerfaces and if any of the ipv4 addresses start with10.0.12, it will make it participate in area 0 of ospf. any directly connected networks to those matching interfaces (whatever mask they may be) will also be included in ospf and be advertised and shared with the ospf network. again, this only looks at the ip of the interface, not its subnet mask - now the ospf neighbours will have to elect and decide on a DR, BDR and go through the ITELF process to reach full adjacency
show ip ospf neighbourwill show the neighbourshipsdefault-information originatewill impose any default static routes to the ospf so every other ospf router will learn the route. This would be needed if a router is not advertising its default route, causing other routers to not have that route information.default-information originate alwayswill always advertise the default route even if it doesnt have a default route.
VLAN
show vlan brief: show available vlans and the associated interfacesshow int trunk: to see details for trunking and associated vlans. note that all swithes in the path of a vlan need to be aware of the vlan, even if they are trunking. otherwise, that packet may be dropped- create a vlan in
conf tmode usingvlan 10. If the vlan doesnt already exists, it will be created when you assign an interface. so this step is not compulsory. but its good to be explicit - from
conf tmode, select the interface you want to assign to the vlan usingint g 0/1 - specify the switchport mode using
switchport mode access. For now, we are creating access ports and not trunking - specify the vlan to use using
switchport access vlan 10
Trunking
- from
conf t, select the interface to be used for truning usingint g 0/1 - specify the 802.1q standard using
switchport trunk encapsulation dot1qto be used for tagging - use
switchport mode trunkto set the switchport mode to trunking, (and not "access" or "dynamic negotiation") and youre done! - verify using
show interfaces trunk
DHCP
-
we first need to specify addresses that are excluded from the dhcp range. this is done using
ip dhcp excluded-address 10.0.0.1 10.0.0.10. The format is first address followed by the last address. So the above command would exclude the addresses 10.0.0.1-10 from being distributed. This is needed before configuring the pool. individual addresses can also be excluded by not specifying a second ip. -
Now, create a dhcp pool using
ip dhcp pool THE-TEN-POOL. This will create a pool named THE-TEN-POOL and enter the dhcp-config mode. If such a pool already exists, it will just go to edit it. -
network 10.0.0.0 255.255.255.0to specify the range of addressed to hand out. You can also specify the prefix length as well here (quite rare for cisco). sonetwork 10.0.0.0 /24also works to the hosts. -
default router 10.0.0.1to specify the default gateway -
dns-server 10.0.0.1to specify the dns server. multiple addresses can also be specifed by daisy chaining. eg:dns-server 10.0.0.1 1.1.1.1 8.8.8.8 -
The lease time can be secified by
lease 1 2 3, the format islease <days> <hours> <minutes> -
see more options that can be configured using
?. Finally, useexitto exit out of the dhcp-config mode -
the leases/bindings can be viewed using
show ip dhcp binding -
to make a router use a dhcp address for itself, use
ip address dhcpbeforeno shut -
to configure a router as a relay, select the interface at which the addresses should be distributed using
int g0/1. now set the relay usingip helper-address 192.168.12.1where 192.168.12.1 is the address of the relay on the other network. 192.168.12.1 should be reachable by this router. but the dhcp server may choose to distribute adresses from a different pool than this address
STP
- Root Switch is selected: Uses oldest (manufactured) switch unless configured otherwise.
- Root port is selected based on the better path, using the following criteria
with decreasing priority:
- Lowest Cost. (gigabit has cost 4, FE has cost 19)
- Lower bridge id. (bridgeid of the from 32582.1111.2222.3333 here 32582 can be configured. the rest is the mac address)
- Lower port number now, the port with the better path is called the root port
- it will turn on 1 designated port per segment. a designated port is a port that is active/alive/forwarding. a segment is any switch link. Now this will also follow the same priority rules as selecting the root port. Note that all ports attackhed to the root switch becomes designated ports.
- Any other ports that are left (neither root nor designated ports) are blocked
ROAS
- The secret is to create sub interfaces on the interface attached to the trunk port and configure it like any other port
- Use
int gig 0/0.10to create the.10sub interface - Now configure trunking and vlans. (to be added)
Switch
On packet tracer, the switch might be powered off by default. add a power module by dragging it into the switch. (physical tab)
Note that switch interfaces, by default come up. rouer interfaces are shutdown by default
It might take a while for the interfaces to go from orange to green. It is waiting for the spanning trees to check for any loops in the network
Routing
Dynamic Routing
Protocols can be static or dynamic
Dynamic can be of different types
- IGP : Interior Gateway protocol
- Distance Vector (aka Routing by rumour since routers only get data from
neighbours, not directly from other routers)
- RIP (uses hop count)
- EIGRP (metric based on lowest bandwidth and route delays)
- Link State
- OSPF (cost of each link in the route)
- IS-IS (cost of each link but costs not calculated automatically. all costs are 10 by default)
- Distance Vector (aka Routing by rumour since routers only get data from
neighbours, not directly from other routers)
- EGP (Exterior Gateway protocol)
- Path Vector
- BGP
- Path Vector
Dynamic routing protocols use different metrics to choose the best route
Metrics cannot be compared between protocols
ECMP: Equal Cost Multi Path : When metric is same for two routes, both the routes are added and traffic is load balanced between them
AD: Administrative Distance : Signifies how trustworthy a route is : Lower AD routes will have higher priority. Routes learned through protocols with lower AD will be preferred regardless of the metrics since those metrics cant be compared directly. Note that AD values can be changed manually. Given are some of the ADs:
| Type/Protocol | AD |
|---|---|
| Directly connected | 0 |
| Static | 1 |
| eBGP | 20 |
| EIGRP | 90 |
| IGRP | 100 |
| OSPF | 110 |
| IS-IS | 115 |
| RIP | 120 |
| EIGRP(external) | 170 |
| iBGP(internal) | 200 |
| Unusable route | 255 |
dnsmasq
Static routes may be issued to clients using the dns option 121 (classless-static-route) RFC3442.
eg: This configures the route "10.10.10.0/24 via 192.168.1.100"
Note: there is also the older option 33 (static-route) which allows specifying classful addresses. It doesn't allow classless CIDR notation.
dhcp-option=option:classless-static-route,0.0.0.0/0,192.168.1.1,10.10.10.0/24,192.168.1.100
Stating the 0.0.0.0/0 route is also requires as clients ignore the default route if a classless route is issued.
From RFC3442 Sec: DHCP Client Behavior
If the DHCP server returns both a Classless Static Routes option and
a Router option, the DHCP client MUST ignore the Router option.
Resources / Bookmarks
- Keith Barker CCNA 200-301 master playlist (Man, I love this guy)